Designing Base For Shed - Methods To Consider When Developing A Outdoor Shed

How to select the best location for positioning your outbuilding
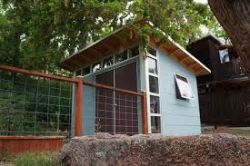
One of the most important decisions about creating a outhouse is choosing where it should go ( review ). Never build a shed at the bottom of a hill or any area that collects and contains moisture. You typically shouldn’t put a outhouse within 10 feet of your rear property line or 15 feet from the side property line. Putting your storage shed into the deepest back corner of the yard may seem like smart idea but should be avoided. Having a shed that is out of the way may look nicer but it will be a lot less convenient when you need to use it. Prospective tool borrowers will return your things to the outbuilding more frequently if it is clearly reachable. You should position the front of your outbuilding on the high side if your backyard is slightly sloping. The placement of the door on the elevated side will ensure the land slopes down towards the rear. Try to keep your outbuilding away from very shady areas. Plenty of sun exposure is the ticket to keeping your outbuilding clear of rot.
How to decide what kind of roof is right for your outbuilding
Cedar shingles are a great option for those who are making a outbuilding on a budget ( detailed garden shed creation blueprints ). Incorporate a wooden roof in wooden outhouse building drawings because they typically lasts 30 plus years and are a great investment in your outbuilding. Center some setting up felt across the top of the roof’s surface and staple into place. Begin laying the shingles in an overlapping fashion. As you lay the shingles you can nail them down with roofing nails. When making your outbuilding assembly diagrams decide if you would like to utilize tar to hold down strips of shingles on your roof. Once the shingles go past the edge of the roof it will be time to cut them back. Bend the shingles over the top in an overlapping manner. This method yields the most durable and long lasting roof. Buy the thickest shingles you can find if you want to invest a little extra in making your roof durable.
There is a common misconception that creating permits are only required for outhouse diagrams larger than 100 sq. feet. However you must apply for a building permit regardless of the size of the outbuilding and have an inspector come out to see it. It is important to get a proper permit so that you will not be forced to disassemble your outhouse if it isn’t to code. The setting up assessor can be very helpful and a wealth of information about your town’s putting together codes. If you show an inspector your blueprints first he can visit the proposed site and answer any questions. Building inspectors can recommend the best building technique and materials for your space. Most importantly the designing examiner will ensure that you will avoid having to correct any structural violations. Administrators in your area need to be sure that you aren’t straddling a property line. Once you obtain a permit from your city you will be guaranteed that you will never have to relocate your finished outhouse. For specific outbuilding-building code requirements in your town you can visit the municipal department.
Properly insulate your shed using these easy tips
Insulation can be harsh to work with so always wear a dust mask and gloves ( designing base for shed ). You must start by measuring the interior height of your walls. A type of starter lining called an airflow barrier is basically just a piece of fabricated plastic. Anyone can install plastic lining plus it is really simple to handle. Drafts of cold air from outside will have a harder time entering the shed once the barrier is in place. Just staple sections of the treated plastic insulation against the inside walls of your outhouse as you wrap around. Place whatever kind of siding the shed construction plans call for to use atop of the air barrier. To guard against gases and other vapors it is a good idea to use fiberglass insulation. Using fiberglass requires that you cover it with another layer as it is irritating to the skin. Drywall works well as a fiberglass cover and can also be easily painted.
Insulation can be harsh to work with so always wear a dust mask and gloves ( designing base for shed ). You must start by measuring the interior height of your walls. A type of starter lining called an airflow barrier is basically just a piece of fabricated plastic. Anyone can install plastic lining plus it is really simple to handle. Drafts of cold air from outside will have a harder time entering the shed once the barrier is in place. Just staple sections of the treated plastic insulation against the inside walls of your outhouse as you wrap around. Place whatever kind of siding the shed construction plans call for to use atop of the air barrier. To guard against gases and other vapors it is a good idea to use fiberglass insulation. Using fiberglass requires that you cover it with another layer as it is irritating to the skin. Drywall works well as a fiberglass cover and can also be easily painted.
